Hedgehogs, Otters and Ballooning Bears

I’ve been working on adding some new critters to the shop these last few weeks. And, a few most recent additions are some of my favorites, and some of the more fun to work on.

Hedgehog

Hedgehog v. 2

Otter

Otter

Ballooning Bear

Ballooning Bear

It’s getting to be the time of year where I have to focus more on production and less on coming up with new designs. But, I’m happy to have been able to sneak these guys in.

On Spinning

Spinning Mojo

After a restful night, it’s a good idea to use some time to transition between sleep and wakefulness. Quiet contemplation or meditation is one way to help the brain and body restore its senses, and put some order to the day. I’m really trying to use this time to get back to my spinning wheel and spend fifteen minutes working some wool through my hands, twisting the soft strands into yarn, working with only the soft morning light of dawn. It takes a few minutes for my hands and feet to wake up, but once that happens I can sit peacefully and allow the process of pedaling, drafting, and feeding to turn into a meditative rhythm.

Spinning Mojo

Spinning wool, flax, cotton or silk into yarn is something that humanity has been doing for many thousands of years. And, not until organized groups of workers in the 18th century came up with methods of mass production, families relied on each other to create yarn and string for use in clothing and textiles. I admit, there is no way I would be able to spin enough wool and cotton to be able to clothe even just myself, let alone my family. But, the process continues to instill in me the wonder that comes from taking such a raw material as wool and working it into something that can, in turn, be knit or woven into a garment. So, even though humanity has gained a lot more time to do other more economically fruitful things by not having to spin, we’ve also lost the joy and pride that comes with being able to custom-make garments for ourselves and loved ones.

Spinning Mojo

These days there are so many great places to find wool to spin, it’s a way to connect with wool producers and get that much closer to the source of what goes into making knit garments and goods. Admittedly, these last few years I’ve slowed down on my spinning ritual, and my collection (or stash) is still fairly significant, so I have given myself a year or so to work through the excess before I go out seeking new fiber. This particular batch is some merino (what I call fun fiber) to help me get back into the saddle, and to loosen up the cobwebs in the “drafting” area of my brain. It’s not a perfect skein, but like riding a bike, I’m sure the actions will become a little more fluid like they used to be.

Spinning Mojo

How-To: Needle Felted Pumpkin

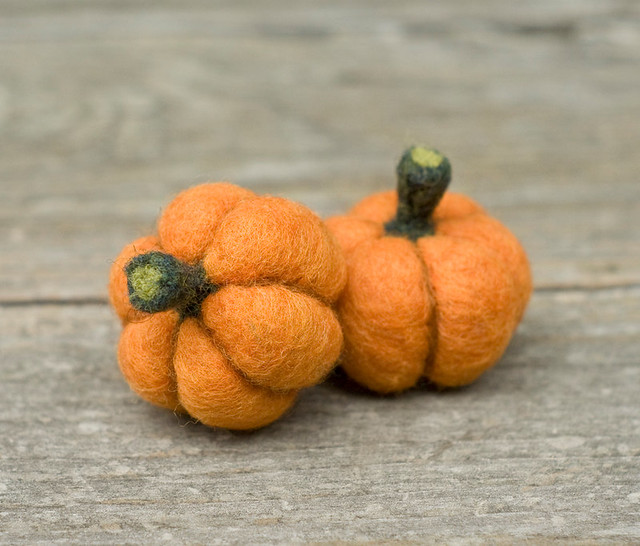
With autumn right around the corner, I thought it would be fun to share a quick and easy project.

Needle Felted Pumpkin

Materials

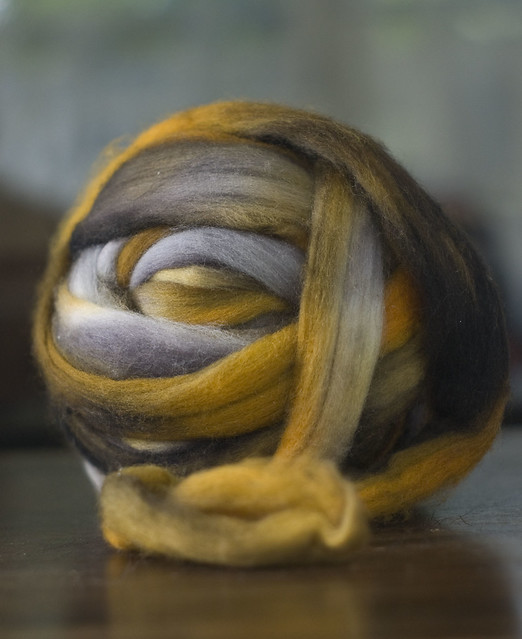
Feltable wool – orange, dark orange, light green and dark green (There are a lot of wool options out there for felting. I find the best type of wool for felting has been carded, but NOT combed. It is sometimes sold in a batt).

You will also need a felting needle (I prefer to use a coarse needle for shaping and a fine needle for details).

Optional: Felting pad (this may make some of the detail work easier, and save your fingers from possible pokes)

General Needle Felting Tips

There is no right way to needle felt. The technique is fairly straightforward. Take a barbed needle to some wool and it will start to become more compact. The more poking you do in one area, the denser the wool will become. Soon and object will start to take shape.

I usually shape with my hands before felting. If the object you are making is round, start with a roundish shape of wool— one that’s been pulled together tightly. (If you start out with a loose “cloud” of wool, it might take awhile before you start to get the wool to felt together.)

Layering the wool will help you build up a form that is also firm and compact. The end result will hold its shape better and be easier to add details to.

Step-by-step Instructions

IMageSteps

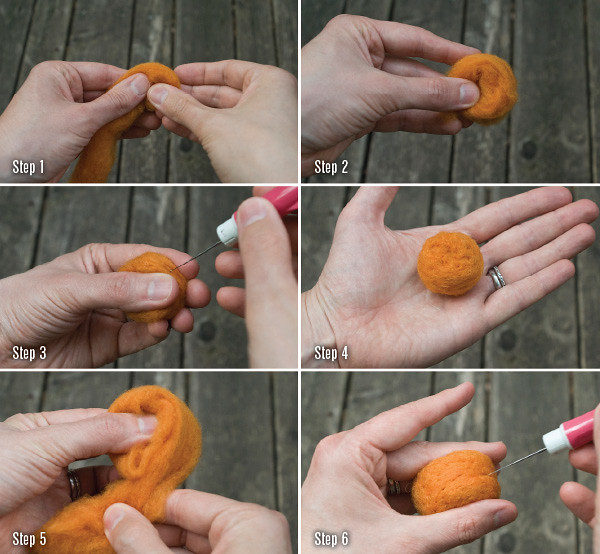
1. Start by rolling up a small piece of orange wool.

2. Try to keep the roll together.

3. With a coarse needle, start felting around the entire shape, making sure to poke in any loose pieces.

4. You should end up with a small, flattened ball.

5. With another piece of orange wool, wrap the felted ball (from steps 1-4), in the same manner as before, making sure to hold it together.

6. With a coarse needle, felt around the entire shape, making sure to poke in any loose pieces.

IMageSteps2

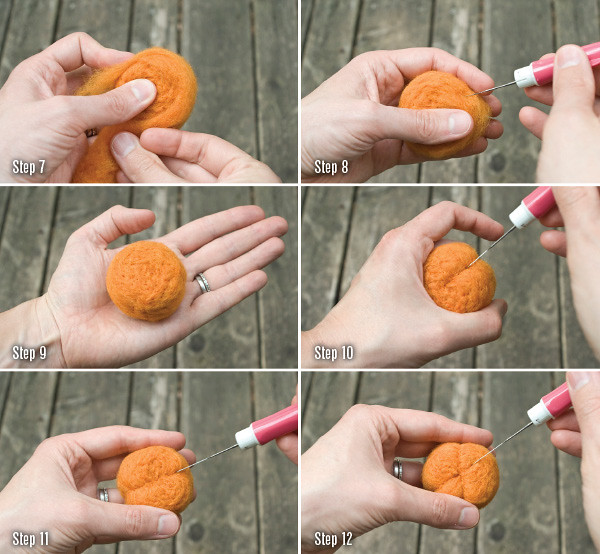
7. With another piece of orange wool, wrap the felted ball (from steps 5-6), in the same manner as before, making sure to hold it together.

8. With a coarse needle, felt around the entire shape, making sure to poke in any loose pieces.

9. Shape as necessary so as to resemble a slightly flattened ball

10. Using the coarse needle and starting at the top center, needle felt a ridge down one side to the bottom center.

11. Turn pumpkin around and repeat.

12. Turn pumpkin and repeat as necessary for desired number of ridges.

IMageSteps3

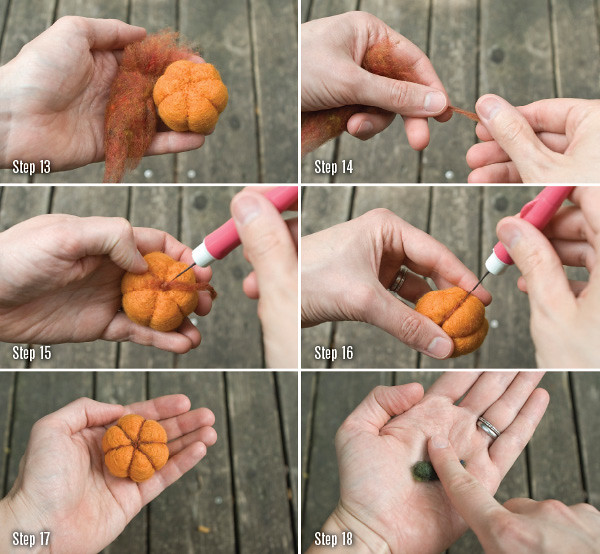
13. Take a small amount of the dark orange wool.

14. Pull and twist a small bit of wool. This will be used to emphasize the ridges. Make a piece that is slightly longer than pumpkin circumference.

15. Starting at the top center, poke one end of the twisted wool and start working your way down one side, felting it into the ridge.

16. Fill in all the ridges, starting at top and working all the way around.

17. See the pumpkin taking shape?

18. Take a small piece of dark green wool, and with a dampened finger, roll back and forth, favoring one end to make a conical shape.

IMageSteps4

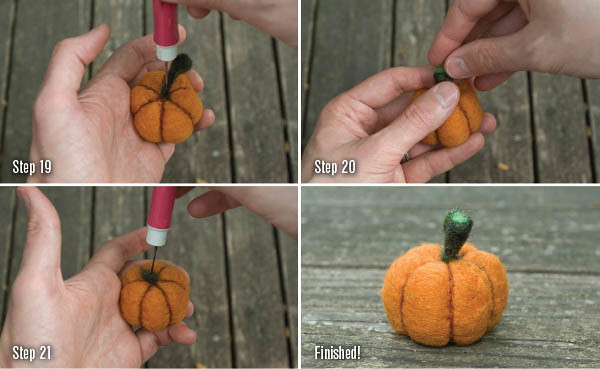
19. Work the thinner end of the stem into the top of the pumpkin, poking until it is very secure.

20. With a very small piece of light green wool, carefully flatten the top of the stem, while shaping and working in the light green piece.

21. With a very small piece of dark green, work a small piece into the bottom of the pumpkin, covering up center with a small circle of dark green.

Finished! That wasn’t so bad, was it? Time to make another! Or, if you want someone else to make one for you, you can order one or more from my shop.

Another Start

Fountain

Believe it or not, I am going to give this another shot. As busy as things have been, I do sometimes miss stepping back a little, capturing some thoughts, tidbits, and the occasional photo.

Our lives continue to revolve around being makers, and there is an intentional simplicity that is behind a lot of our decisions (not to mention that we just like the process of creating and filling our home with the things that we make). Increasingly, though, I am confronted with the fact that we are becoming more and more disconnected from the sources of our own well being—our food, our clothing, our shelter. Convenience plays a big part in the reason why this is happening. And, I am the first to admit that I appreciate the convenience that comes from living in a society built on mass-production.

However, it is hard to ignore, nor do I want to, the inequalities that exist in a post-industrial society, or the waste that is generated by living in a culture of disposability. These things exist and are a drain on resources and on our environment. Part of my hope with rekindling this blog is to nurture appreciation for the things that we do own, or plan on consuming in the days to come. Through the act of making, I would like to encourage us to take the time to consider the basic needs of our lives, and weigh the true costs of the stuff that we accumulate and use while going about our days.

Through sharing projects and inspiration, perhaps we can gain a little more understanding about the process and origins of the things we use. And, maybe, be OK with a little inconvenience in exchange for unique, handmade (by scratch!) goods and experiences to fill our lives.

Braveheart

It’s been a busy weekend at Bunny Acres. What with a trip over to Art-A-Whirl on Saturday (support the arts),  a trip to Shepherd’s Harvest (can never have too much wool), and most exciting of all, a small litter of bunnies emerging from their nest right beneath our dining room windows (hours of entertainment).

We managed to sneak a video of the first time out (and back again):

Baby Bunnies - First Day Out

And, after running back into the nest for a bit, the one we’re calling Braveheart has now ventured forth, and, we think, hanging out under our deck. Fortunately, s/he didn’t have to hop very far for cover.

Braveheart

Be strong, little ones!